WARNING: Luan generates splinters that are painful and can cause infections. They are very sharp and are quite painful when they get in your eye. Do not take this lightly. Please wear safety glasses and gloves when cutting Luan.
We'll start with the cutting diagram below. Click on the diagram to enlarge.
 The original plan was to have five "wedges" instead of four. However, when I went down to the basement to plot them out I found that it was a bit more difficult to do than I first thought while drawing it on the CAD system. My brilliant wife challenged my five section thinking and asked my why I had not used four which would allow for an easier mark up. When I looked at the drawing and tested her theory, I figured that the loss of one more support in the module would not affect its strength and modified the drawings per her suggestion. Thanks honey! The new design is much easier and can be laid out without bisecting arcs or fancy geometry.
This morning I had Home Depot rip 5 sheets of 3/16" Luan for me. They are nice and square.

Naturally, the work desk is a mess and has to be cleaned up before I start. I left the panels on the floor to flatten out and I'll use my 290 lb bulk to flatten them further as I stand on them. Fat has its advantage. Usually at the all-you-can-eat restaurant. Nobody gets in my way!
 I was going to draw a lot of radii, so I figured I'd invest a little time in making a radius tool for the project. None of my other ones were over 4' in length.
 I clearly label the radius tool because it is a scrap piece of wood and will get used or thrown out if it is not clearly marked. I'll keep it by the other measuring devices in the shop.
 Instead of nails like many people use, I use a screw for the pivot point. It locks the tool in place and it won't move until you want to take it out.
 Carefully I draw all the radii on the panel using a gel pen. I couldn't find a pencil and the dark in shows up better on the Luan.
 Each radii is no on the panel. The main centerlines I go over twice so they are darker. Thought about using another pen color.
 Next I marked the 20" dimension for the section line.
 One on each side.
 Here you can see the section lines and their 1" parellel line that goes on either side. The parallel line will be used to draw the "holes".
Throughout the evening I was visited by Quality Control She used her flashlight to show my mistakes to me. Just like her mother....
 Here you can see the lines
 Once all the tangent lines were drawn, I used a roll of masking tape to draw the filets in. These filets are necessary for adding strength to the module and should not be left out. I would not use the masking tape roll again as it is a 1.5" radius. A 2" radius (now in the drawing above) is much easier to cut with a sabre saw.
 Here you can see the filets drawn in the "holes" or "cut out sections"
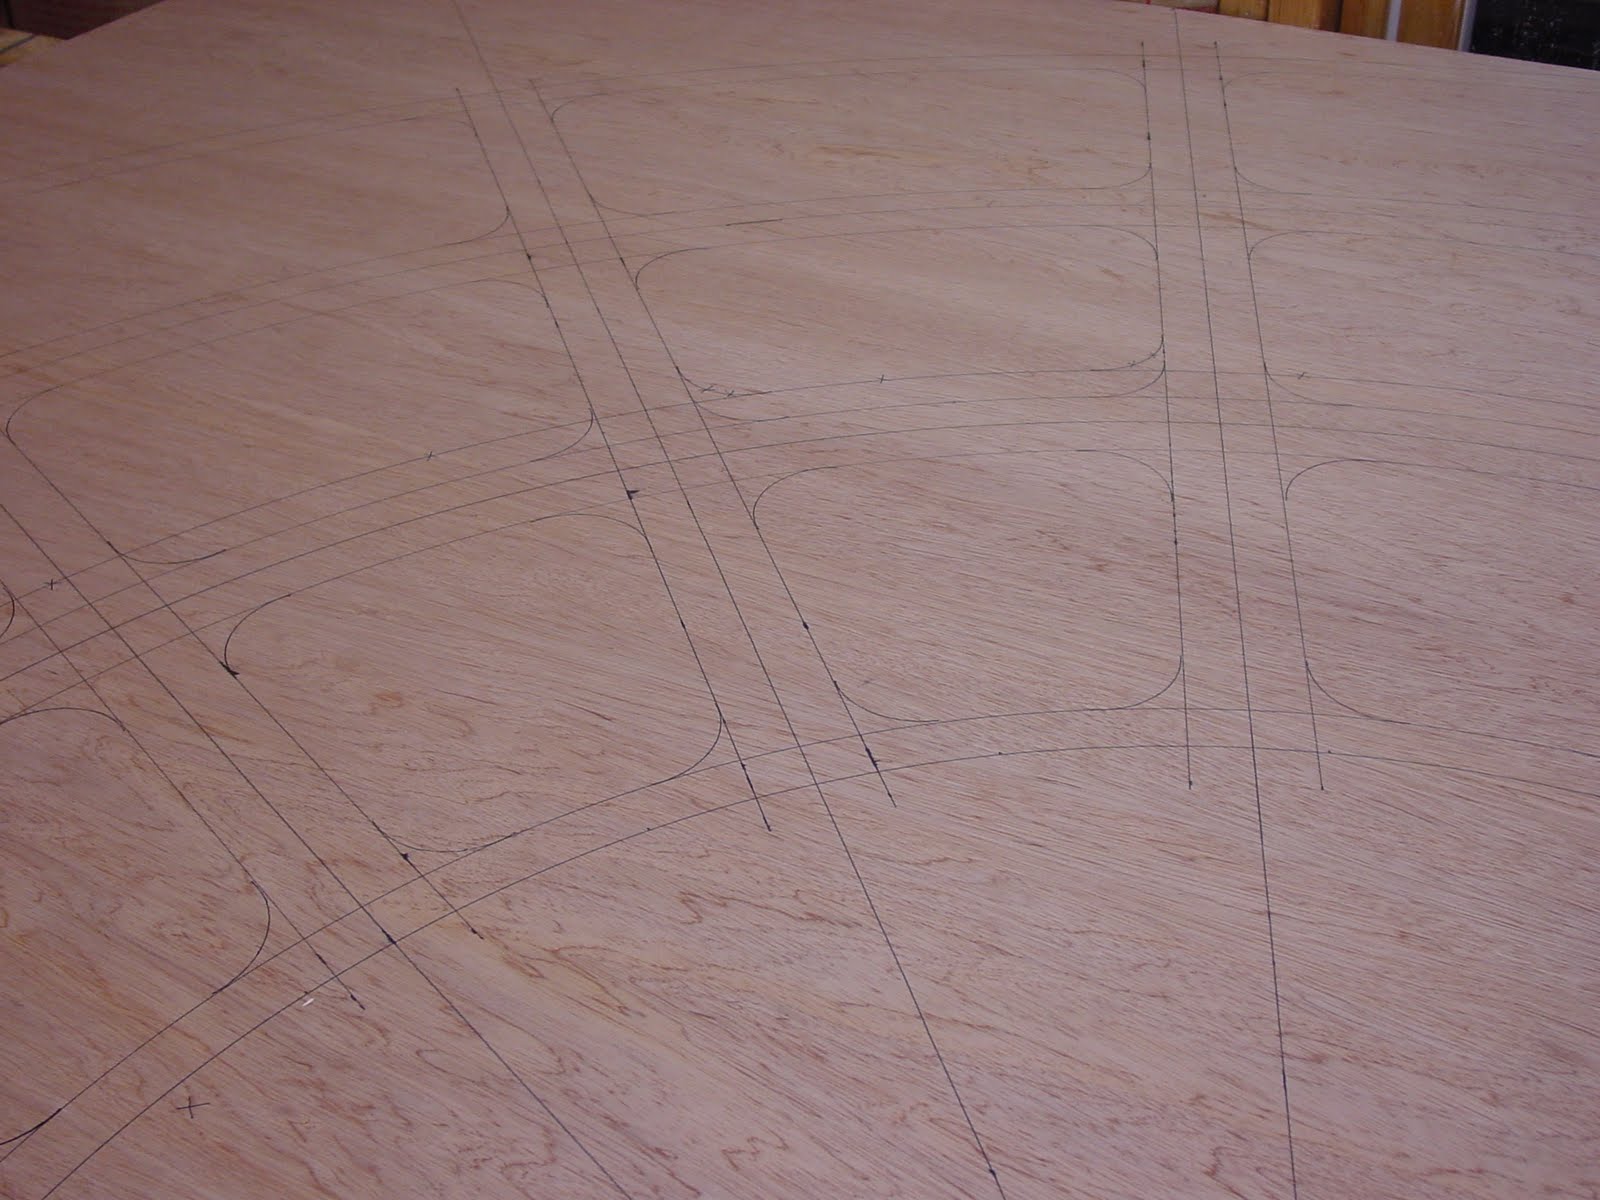 Looking good! Let's make some sawdust. Safety glasses, everyone!
 The panel is larger than the work table and quite flimsy. I will use a variety of clamps to keep it on the table and give it strength.
 I drilled 1/4" pilot holes for the saber saw blade. One for each cut out section.
 I also made 1/8" holes along the centerline of each section, two each, so that I can easily draw the center line on subsequent module bases. This base will be a template for all the others so that I don't have to measure each one.
 This picture was to remind me to ask Santa for a new saber saw with an LED light. I really like the lights and lasers on the new equipment as it makes cutting easier.
The ice melted in my water. I need to get another one of the fancy insulated cups for the basement so the drink stays cold.

I began sawing out the cut out sections. Right away I notice that I should have made the outer and inner radii sections 2" wide instead of 1". This will be corrected on the next base.

Here is the waffle base. It doesn't weigh hardly anything, but the wood is incredibly strong. I've built two modules with waffle luan and co-built two 4x8 layouts with this technique. It is AMAZINGLY strong. To make my point we accidently rolled a 15 lb bowling ball of a table and onto a module. Didn't even make a dent. The 4x8 layout that Paul Voelker and I built was so light that you could pick up the entire layout with ONE FINGER. This stuff does not warp, is cheap and can be formed into almost anything. The drawbacks are the splinters and the time it takes to cut out and assemble.
 All of the cut areas have to be sanded. Instead of using the belt sander which throws the splinters everywhere, I just use a sanding block. It is quick and easy.
 This edge is just too thin, so I'll widen it on the drawings and the next module to 2".
 Now I'll lay the first module on the next panel and trace all the cut outs. I'll make adjustments for the 2" outer radii and then cut it out.
 Here is module 2 with the wider outer radii. This is MUCH stronger and will give me more room to glue support blocks to the outer panel.
Here are the two module bases laying on the shop floor. You HAVE to keep these 100% flat or they will warp until you get the supports on. Damn, this is smaller than it looks. The center operating pit was designed to be 3' wide, but it looks awfully small for my fat frame. Looks like the layout height will be taller than I thought so that I can get in.
I'm headed out to eat turkey, but will work on it some more this weekend. Next step is to make two more bases and rip some 3.5" supports.


Scott wrote: Damn, this is smaller than it looks. The center operating pit was designed to be 3' wide, but it looks awfully small for my fat frame. Looks like the layout height will be taller than I thought so that I can get in.
ReplyDelete*****************
Nice layout, Scott.
I'm running into a similar "inside the layout" space issue with using my S&SSNC modules in my basement. I don't have enough clearance in between the modules. Our "grid" is in 2 foot increments, length wise, but I don't want to make the layout 2 feet wider due to space limitations. So, I have a dilemna. I'm thinking about building 2@ 1 foot lengths to make some more space. One could do something similar with this layout if they had the space.
On the height, we use 48" to the rail head. That makes it much easier to get under the layout.
I'd also HIGHLY recommend casters at the bottom of the legs - see some of our drawings for details. This would be a piece of cake for these 4 modules and you'd LOVE it.
Glen Frix
Great idea Scott, I look forward to seeing the layout develop. If you were to clamp the 4 bottom waffle portions together, you could cut out all 4 at once and save yourself some layout/tracing/cutting/clean up time. The inner layers will splinter less and need less clean up. The clamped up ply will also be stiffer to cut. Just my 2 cents, hopefully it helps somebody out.
ReplyDeleteTim