After a quick trip to Lowe's for some pipe, caps and feet and a wonderful lunch with my family (I went and got Taylor from school, too), my family joined me in the basement.

First I cut out six more legs at 23 1/2" inches each and then center drilled six more caps.

The foreman helped me by unpacking the feet and twisting the mounting nuts off, then putting the trash away. She is a big help for the 10 minutes of attention span I can get...then it was off to play with dolls. Yuck! Girl stuff.

I screwed in each of the feet half way and glued the caps to the legs with modeling cement. I didn't have any pipe compound around and didn't want to spend another $5.00 for a jar that would just go bad. Use what you have!
 Using 1/4" plywood I cut three more 1' x 1' boards for mounting the legs on.
Using 2" x 2" stock I cut the 3 1/8" reinforcing blocks (four each) for each of the three plates and glued them in place.

Once glued I marked where the screws should go, remounted the plywood board with ample glue, and screwed it down.

The legs were screwed in to the plywood with 1 1/4" drywall screws. Now that I've completed all the leg assemblies I'm not sure that I would screw them like this. Next time I'll use nuts and bolts since the sharp screws protrude into the other side of the section.

This leg set was a little warped and required some adjustment with a ball peen hammer. The leg assemblies are a bit weak without the reinforcement of the base, so you may want to check them at the store to make sure they are not deformed in some way.

The final assembly went very quickly! I've got a rhythm going!

Now I've got a leg to stand on!

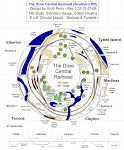
With the help of my wonderful and very pregnant wife, we were able to assemble the sections into their final form. I still have some adjustments to do, but it should go together with one person in a snap once I get the locking pins in place and do some fitting. The pit is PERFECT for my fat frame and I can get in and out easily while still having plenty of room to move around without feeling claustrophobic.

The 48" height is perfect for me! Though it doesn't look it the benchwork is very level and reasonably stable. It does want to giggle in a circular fashion when bumped, so I'll get Bob the engineer over to help me figure out a way to stabilize it. My wife thinks its because I didn't have all the feet leveled out and she is probably right. She always sees stuff like this so its great to have her opinion.

I can easily reach 100% of the layout from any direction now and this will probably still hold true when I have the scenery in place.

I'm not happy with the sharp screws of death. We may redo these with nuts and bolts just for the safety of ....well....me!

I also need to add some clamping pads which I'll do next session.

The legs are strong but just a bit wobbly. Not sure what I can do to take that wobble out. At a train show some !@#$!@#$ will bump it and it will be just enough to dump the train on the floor.

I'm going to paint the leg extensions and the kick leg black. A curtain will probably cover them, but the white legs stand out like a porcupine in a nudist colony.

Also on the next basement trip we'll finish off some of the rough spots on the layout like this overhang. The new sander works well so we'll belt this off and smooth with the palm sander. I just want it to be smooth enough for the fascia board to be glued on over it.

Some spots meet very well, so there won't be too much adjusting.
I'm so excited about this layout. It has such a different look to it! Can't wait to get the track on it. The order was placed today for 36' of Micro Engineering Code 83 Weathered flex track which should arrive Wednesday. An excellent layout!


From Bob...
ReplyDeleteScott, great write-up and concept.
Regarding the wobble, we found the same thing with the Piedmont Raffle layout. When we adjusted each foot to be sure that all are firmly in contact with the floor, the layout was much more stable. So as Marie said, if you go around and snug up all the leg screws it will help..
Bob